
First of all be informed that this technique is a tricky one but possible. Most of the methods go awkward to set up and create a mess, ending up in nothing. I have tried almost a 50 methods but failed. Let me share with you about the technique with which i was able to access Wi-Fi using my laptop as a hotspot.
This is based on the Windows 7 feature called ‘Virtual Wi-Fi’ and thanks to Microsoft. This method just initialize your Operating system to create a Virtual router and then you can use it like how much ever adapters based on you need. All that you need now is a Laptop that runs on Windows 7, Wi-Fi enabled, Virtual router software, make sure the adapter drivers are all installed in your laptop and finally you need a device to access the Wi-Fi hotspot that you have created. All set? Lets go..
1. Click Windows Start button, type CMD, right-click the Cmd.exe link and select “Run as Administrator”.
netsh wlan set hostednetwork mode=allow ssid=MyNetwork key=MyPassword
In the above command attributes, MyNetwork is the network name and you can replace that with the name that you like to use. Also have the password of your choice by replacing MyPassword in the above command.
2. Press ENTER to create the virtual network and establish the same in Hosted mode. The type the below command:
netsh wlan start hostednetwork
This command starts the virtual network and make it functionally ready to access.
3. Press ENTER and this starts up the Virtual adapter successfully in your Laptop. No confirmation message is displayed. No worries if you get no errors, else recheck the command and just the last command line again.
4. Click Start > Control Panel > Network and Internet > Network and Sharing Centre > Change Adapter Settings, right-click your internet connection and select Properties. Click the Sharing tab, check the “Allow other network users to connect…..” option, select your virtual Wi-Fi adaptor – and you’re through!!
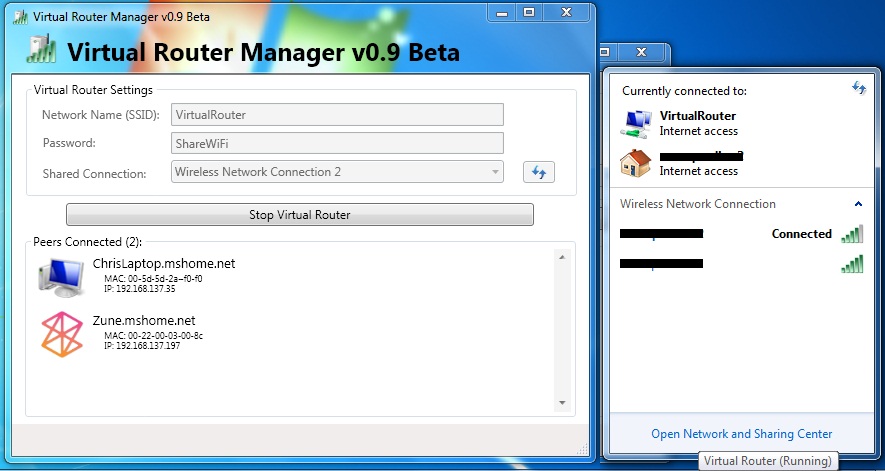
5. Launch the Virtual router 
Now turn ON the Wi-Fi option in Mobile, iPod, Tab, another Laptop / Computer and search for the Wi-Fi. You should be able to see the hosted network with the SSID you have created now. Select the same and check in with the password that you have created in command mode in Step 1. Access the hassle-free Wi-Fi connection and download your favorite Music, updated, etc on your Wi-Fi devices.
It is obvious that you may face frequent network down or other hassles, the best way to get out of this is none other than restarting your machine and network. Just like the start up, have a proper closure and shut down. That makes your Browsing experience wonderful every time. For any intermittent issues, click on Refresh button that’s visible in Step 5 screenshot. Most wise option is to restrict the background date of unwanted apps in the mobile app list.
Have this Wi-Fi hotspot and stay updated in Apple, Android and RIM devices as every App is updated and its you who need to be in sync with it to stay updated. Thanks for reading, post your comments & experience, I would love to hear from you. 🙂
